Did you know that you can use your Quext IoT Resident app to create “events” — thermostat operations that happen on scheduled days and times? Well, you can! Even better, it’s brilliantly simple and a great way to save energy!
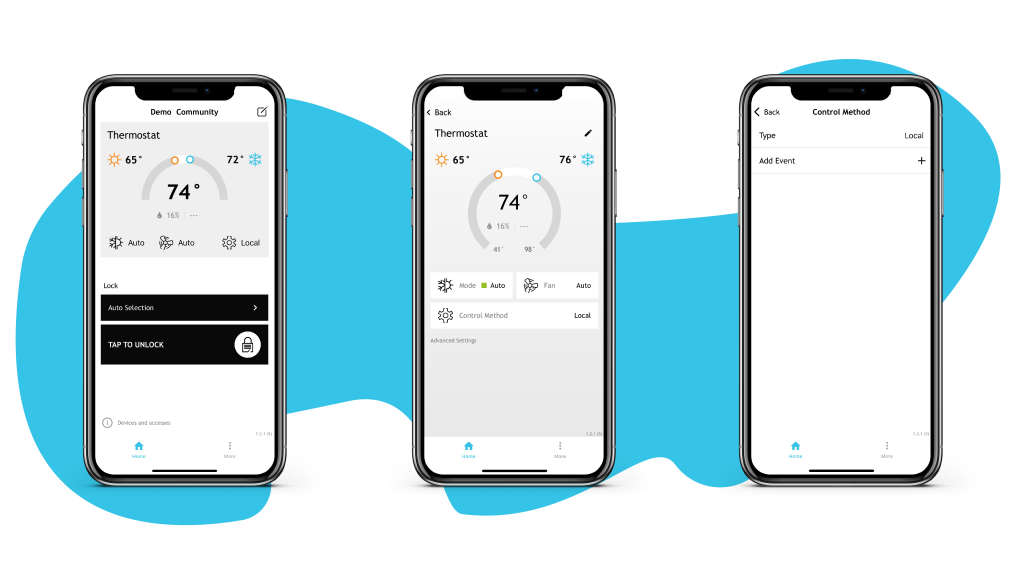
From the home screen of your Quext IoT Resident app, tap the gray box around your Thermostat section. Tap Control Method, then the plus ‘+’ button to open the Add Event page.

Here’s where the magic happens! You have total control of how you’d like your living space to feel each day of the week. Just follow these five steps to set up your schedule:
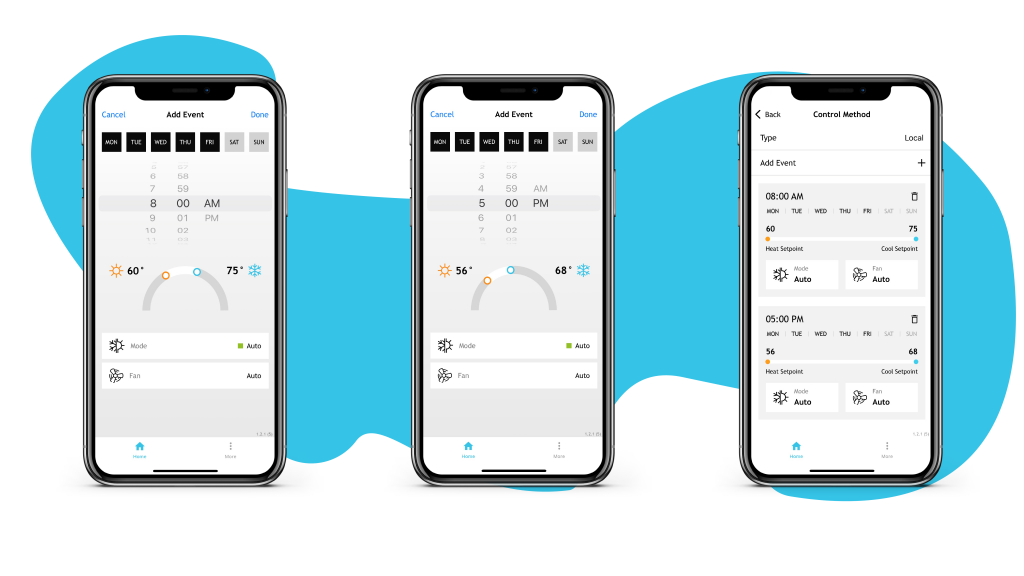
- Using the buttons that are labeled with abbreviations for each day of the week (Monday through Sunday), select the days of the week on which you’d like this event to be active.
- Scroll through the time bars to select the time the event should start, and whether the event is taking place during the AM or PM.
- Use the sliders to set your desired temperature (for Heat and Cool modes) or the temperature range you want to operate inside of (if you’re in Auto mode).
- Finally, tap the Mode and Fan bars to select the settings both will enter into at the event start time.
- Select Done to save the event and return to the Schedule list page.
You can even create multiple events (because let’s face it, we’re all different people on Mondays than we are on Fridays!). Just remember: every event has a start time but no end time. So, each event on your list ends when the next event begins. While an event is in progress, ‘Smart Mode’ is active on your thermostat and any manual changes to the temperature and fan settings will only temporarily override the settings before the next scheduled event begins.
And, hey! Maybe you decide that your busy weekday schedule during the summer means you need a chilly environment to come home to? No problem! Each event can be changed with your changing needs.
From the Control Method page, tap an event to open the Edit Event page. Make your desired changes and select Done.
Or, to delete an entire event, tap the trash icon in the upper right corner of the event’s tile. When you are prompted to confirm the deletion, choose Yes to permanently delete the event.
That’s all there is to it. Now just sit back and enjoy the benefits of all your hard work (even though that was no work at all!).


